A Step-by-Step HubSpot Forms Guide for Marketers
In today’s digital marketing landscape, capturing high-quality leads is the lifeblood of business growth. Here’s where HubSpot Forms shine, offering a compelling solution that goes far beyond simply embedding a contact form on your website.
Getting started with HubSpot Forms is a straightforward process that can significantly enhance your lead generation and customer engagement efforts. HubSpot Forms are part of the HubSpot CRM platform, designed to help you capture information from your website visitors through customizable forms.
Here’s a step-by-step HubSpot Forms guide on how to get started, set up, and access your HubSpot account to utilize HubSpot Forms effectively.
Creating and Customizing Your First HubSpot Form
HubSpot Forms are a powerful tool for capturing leads and engaging with your audience. By following these steps to set up and access your HubSpot account, you can start creating, customizing, and integrating forms into your marketing strategy. Remember, the key to success with HubSpot Forms is continuous optimization based on performance data to ensure you’re always capturing the most valuable information from your audience.
Step 1: Accessing the Form Builder
- Navigate to your HubSpot dashboard and click on Marketing in the main menu.
- Under Marketing, select Lead Capture and then click on Forms.
- In the upper right corner, you’ll see a button labeled Create form. Click on it to initiate the form creation process.

Step 2: Choosing Your Form Template
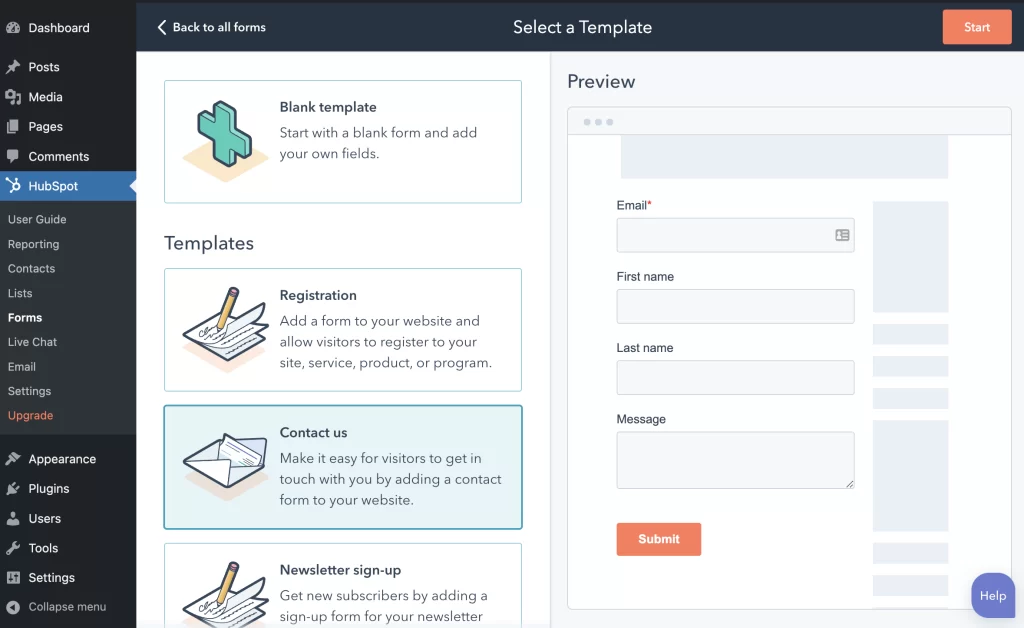
HubSpot offers a variety of pre-designed templates to jumpstart your form creation:
- Blank Template: This offers complete freedom to design your form from scratch, ideal if you have specific requirements.
- Blog Signup Form: Capture email addresses for your blog newsletter and nurture leads with valuable content.
- Event Registration Form: Simplify event registration by collecting attendee information through a user-friendly form.
- Generic Contact Form: This versatile template is a great starting point for capturing general inquiries from website visitors.
Select the template that best aligns with your needs and click Next.
Step 3: Building Your HubSpot Form
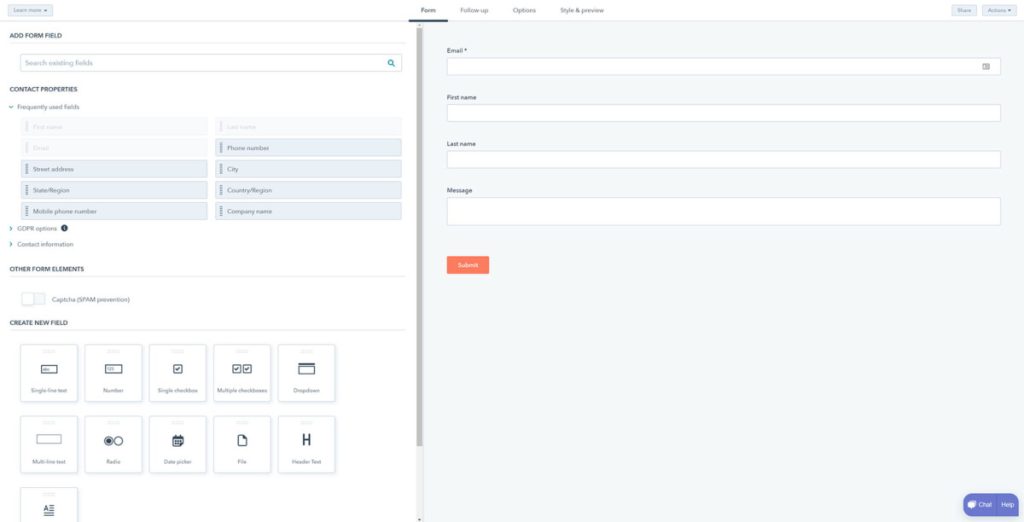
The drag-and-drop interface makes building your HubSpot form a breeze. Here’s a breakdown of the key elements:
- Form Fields: HubSpot offers a wide range of form field options, including text fields, email addresses, dropdown menus, checkboxes, and more. Simply drag and drop the desired fields onto the form builder canvas.
- Form Name and Description: Add a clear and concise form name that entices visitors to complete it. You can also include a brief description that outlines the value proposition of submitting the form (e.g., “Download our free e-book!”).
- Call to Action (CTA) Button: Craft a compelling CTA button that incentivizes visitors to submit the form. Consider using action verbs like “Download,” “Subscribe,” or “Get Started.”
HubSpot Forms empower you to go beyond the basics with extensive customization options
Step 4: Customization Powerhouse
HubSpot Forms empower you to go beyond the basics with extensive customization options:
- Styling: Fine-tune the look and feel of your form to match your website’s branding. Change fonts, colors, and button styles to create a cohesive user experience.
- Conditional Logic: Enhance the user experience by using conditional logic. Imagine a form that hides or displays specific fields based on visitor selections. This streamlines the process and keeps forms concise.
- Thank You Message: Craft a personalized thank you message that appears upon form submission. This is a great opportunity to showcase additional resources or offers.
Step 5: Publish and Promote Your Form
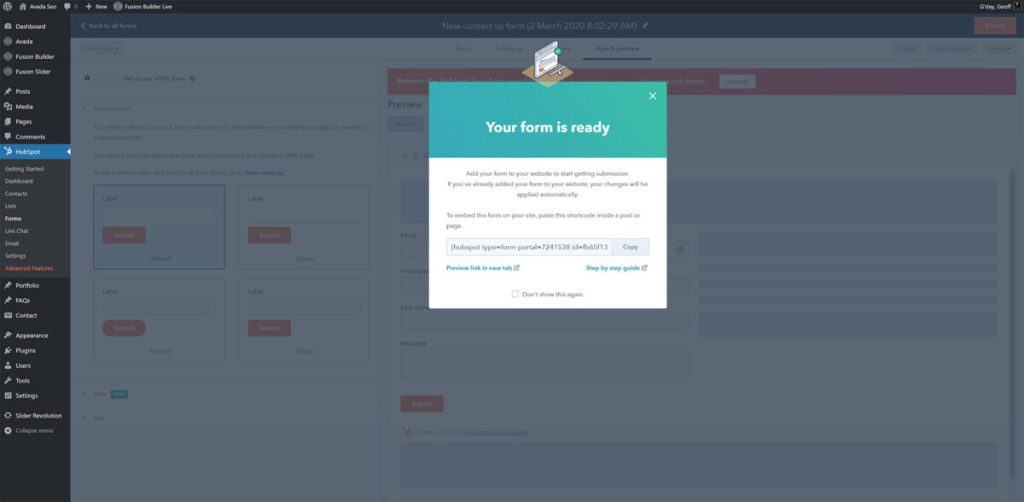
Once you’re happy with your creation, click Publish to activate your form. HubSpot generates an embed code that you can easily copy and paste into your website’s code to display the form.

So, unleash the lead generation potential of HubSpot Forms today and witness your website visitors transform into qualified leads ready to nurture into loyal customers!
Embedding Your High-Converting HubSpot Forms: A Seamless Integration
You’ve created a masterpiece – a captivating HubSpot Form designed to capture valuable leads and nurture them into loyal customers. Now, it’s time to unleash its power on your website! Here’s a guide on seamlessly integrating and optimizing your HubSpot form for maximum impact:
Embedding Your Form: Two Effortless Methods
HubSpot offers two user-friendly methods to embed your forms onto your website:
Method 1: Using the Embed Code
- Once you’ve created and published your form in HubSpot, navigate to the Actions menu and select Embed form.
- HubSpot will generate an embed code snippet. Copy this code.
- Log in to your website’s content management system (CMS) and navigate to the page where you want to embed the form.
- Locate the section where you want the form to appear and edit the HTML code of that section. (This might involve switching to the HTML view in your CMS editor.)
- Paste the copied embed code into the desired location within the HTML code of your webpage.
- Save the changes to your webpage, and voila! Your HubSpot form should now be seamlessly integrated.

Method 2: Using the HubSpot Drag-and-Drop Editor (For HubSpot CMS Users)
If you’re using HubSpot CMS to power your website, you can leverage the drag-and-drop editor for a more visual approach:
- Within your HubSpot CMS, navigate to the webpage where you want to embed the form.
- In the content editor, hover over the section where you want to place the form and click the Plus (+) sign.
- From the toolbox that appears, select the HubSpot Form module.
- A dropdown menu will list all your created HubSpot forms. Choose the form you want to embed.
- Click Save to publish your changes, and your HubSpot form will be beautifully integrated into your webpage.
Optimizing Placement for Peak Conversions
Now that your form is live, consider these placement strategies to maximize its effectiveness:
- Align with Content and Calls to Action: Place your form strategically near relevant content that piques visitors’ interest and compels them to take action. Imagine a compelling blog post followed by a form strategically placed to capture leads who want to learn more about the topic discussed.
- Landing Page Hero: For targeted campaigns with dedicated landing pages, consider placing your form prominently within the hero section, above the fold where visitors see it immediately. Craft a clear value proposition above the form to incentivize completion.
- Sidebar Placement: For forms offering valuable resources like e-books or white papers, consider placing them in the sidebar where they remain visible as visitors scroll through your webpage content.
Conclusion:
In conclusion, as this HubSpot Forms guide explains, creating HubSpot forms is a straightforward yet powerful way to enhance your lead generation and customer engagement efforts. Whether you’re aiming to capture new leads, gather valuable customer insights, or streamline your marketing processes, this HubSpot forms guide helps you leverage a versatile and user-friendly solution.
By following the steps outlined in this HubSpot Forms guide—from setting up your account and navigating to the forms section, to customizing your forms and integrating them into your website—you’re well on your way to unlocking the full potential of this tool.
Happy form building! Remember, every form you create is an opportunity to connect with your audience and grow your business.


 Hi, This is Emma. Let’s get the conversation started!